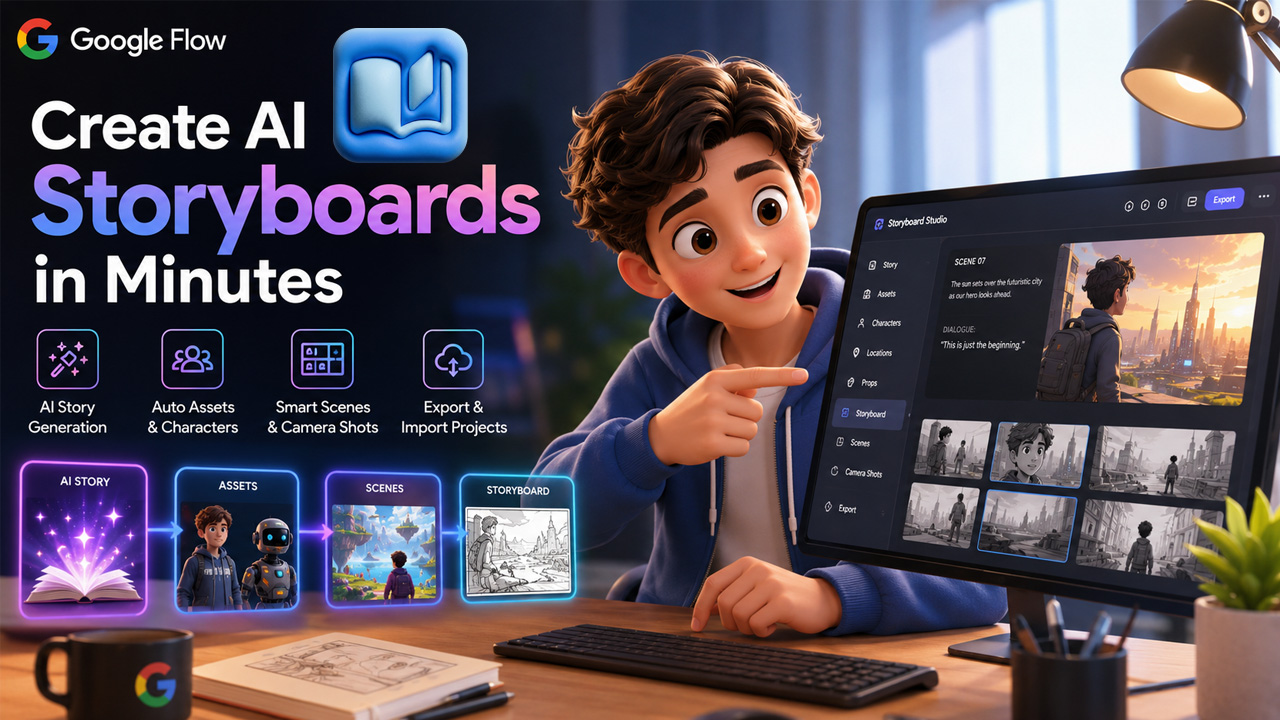
Google Flow is an AI-powered filmmaking platform built by Google. It is created using the Imagen, Veo, and Gemini models to allow creators to move from ideation to completed video without a crew, camera, or an editing suite. Since its launch at Google I/O and absorbing ImageFX and Whisk into a single Workspace, Flow has evolved from a straightforward text-to-video tool into a complete creative studio. One of its most useful features is Storyboard Studio and suits anyone who wants to plan a project before creating a single clip.
Pre-production is a long and time-taking process that affects creators who are working with strict deadlines. Mapping out scenes, sketching characters, and choosing camera angles can convert a straightforward idea into a days-long task. Storyboard Studio modifies that: it converts a written story into a structured and cinematic AI storyboard in just a few minutes, not just days.
In this detailed guide, let us first break what Google Flow is as a platform, then we will explain you each step of the Storyboard Studio workflow, from starting a new project to exporting your completed storyboard, so you can precisely see how it can all come together.
What Is Google Flow?
Google Flow is an AI-driven creative studio built by Google Labs that integrates image generation, video generation, and story planning into a single workspace. It is specifically built around three of the most advanced models of Google:
- Veo (Presently Veo 3.1): the video generation engine, which is capable of environment sound, native audio, and character dialogue inside generated clips directly.
- Imagen 4: It is the image generation model of Google, utilized for character references, still frames, and visual assets.
- Gemini: This is Google’s own LLM model, which drives the prompting engine. Gemini allows you to enter your description in plain and everyday language.
Flow launched as a dedicated AI filmmaking tool originally. In February 2026, Google combined with ImageFX and Whisk into a single and centralized workspace, so anyone who has utilized such tools previously now gets all of that functionality inside Flow. What you get as a result is a platform where video generation, image generation, character consistency, and now story-to-storyboard planning all exists under a single roof and can be accessed at flow.Google.com
What Are the Main Features of Google Flow Apart from Storyboard Studio?
Storyboard Studio is just one component of a bigger toolkit. Some key features that make up Flow workspace are as follows:
- Scene Builder: This allows creators to create multi-shot sequences, keep settings and characters consistent, and extend existing clips across a complete scene instead of just one clip.
- Camera Controls: Adjust movement, angle, and framing within an AI-generated scene instead of just describing it in a text.
- Native Audio Generation: With Veo 3.1, environmental sound and dialogue can be directly generated along with visuals, removing the need for separate audio-editing.
- Ingredients/Asset Consistency: With the help of Veo 3.1, environmental sound and audio can be directly generated along with visuals, removing a separate step of audio-editing.
Since Flow allows you to generate still images as well as complete video sequences, it can exist alongside a wider toolkit for creators who demand more than one format. For instance, combining Flow’s video output with a dedicated AI image tool for supporting thumbnails and graphics.
What is Google Flow Storyboard Studio?
Google Flow Storyboard Studio is a feature within Google Flow that automates the journey from a written story to a fully structured storyboard. Rather than building each scene, character, and shot by hand, the tool reads your story and generates these elements for you. It handles
- Story titles and scene breakdowns.
- Dialogues wherever the story calls for them.
- Character, location, and prop assets.
- Storyboard panels with suggested camera shots.
Everything it generates can still be edited manually, so you get speed without giving up creative control. Much of this automation is powered by AI agents that analyse inputs and complete multi-step creative tasks with minimal manual effort.
Setting up a New Project in Google Flow :
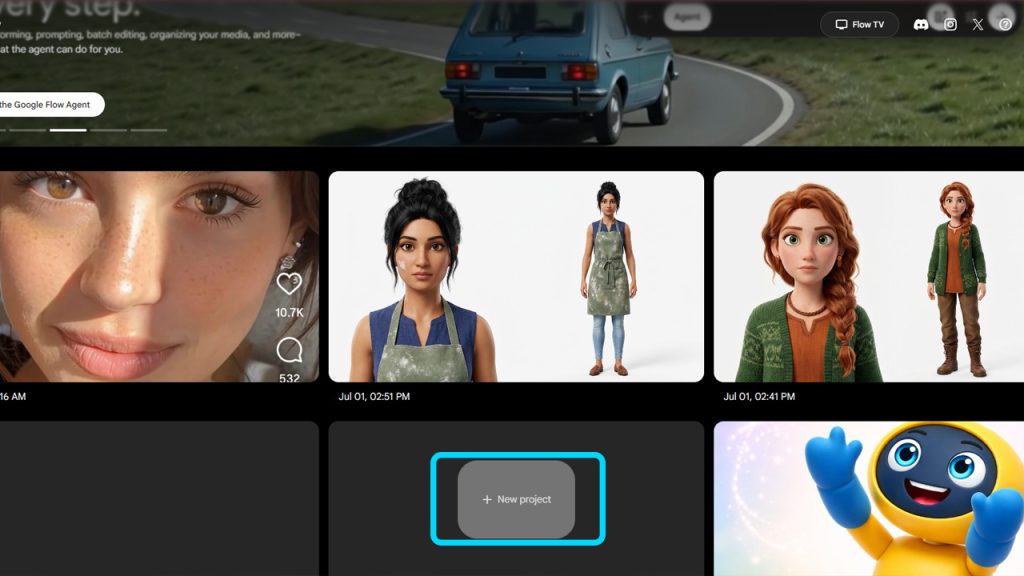
Everything starts with a fresh project, and Google Flow keeps this step simple. Open your browser, search for Google Flow, and head to the official website.
- Click Get Started to begin.
- Create a new project from your dashboard.
- Once it opens, you will notice options like Media, Characters, and Scenes on the left-hand side.
This is your home base for the rest of the process, so it helps to get familiar with the layout before moving ahead.
Using Storyboard Studio :
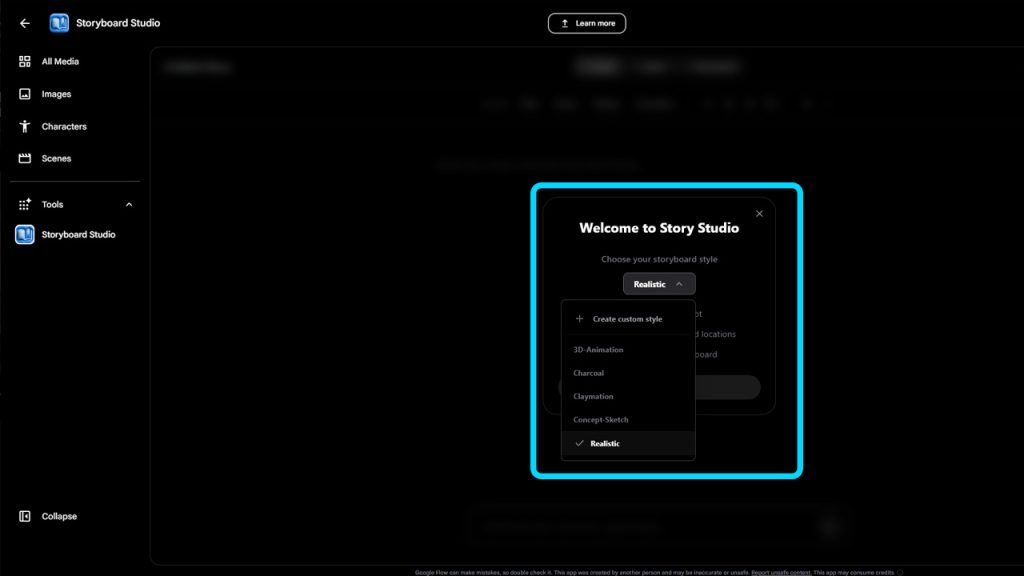
Once your project is open, it is time to bring Storyboard Studio into the picture. From the left-hand panel, click Tools, then select Storyboard Studio and hit Get Started.
- You will first be asked to pick a storyboard style, such as 3D Animated.
- The style you choose sets the visual tone for every panel generated later.
- You can switch styles depending on the type of project you are working on.
Think of this step as choosing the lens through which your entire story will be told visually.
AI Story Analysis :
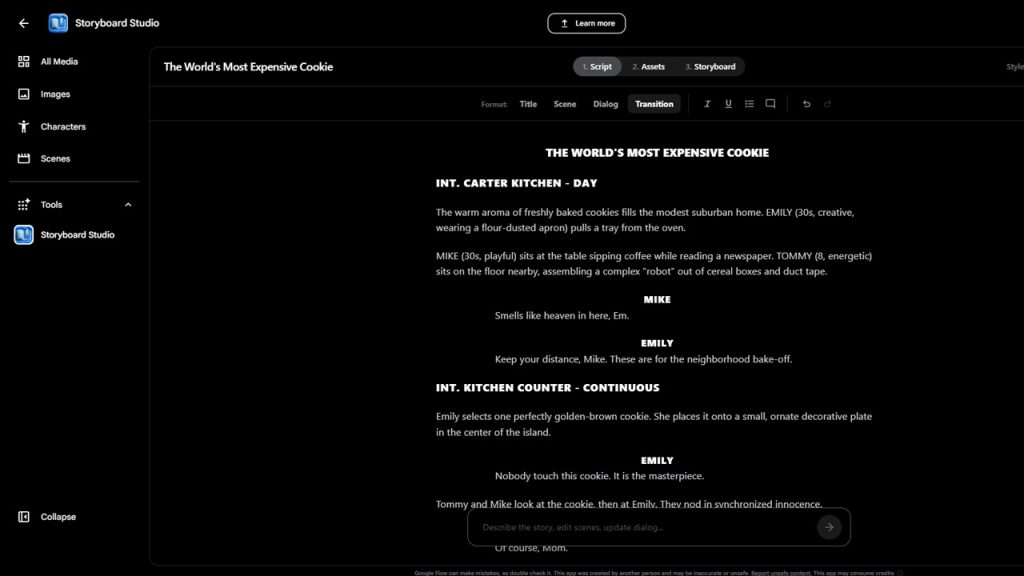
Before the tool can build anything, it needs a story to work with. You can write one yourself or generate one using AI within Google Flow. Once your story is ready, paste it into the editor and make any edits you like before continuing.
From here, Storyboard Studio analyses the story on its own and separates it into usable parts:
- Generates a suitable title for the project
- Breaks the story down into individual scenes
- Creates dialogues wherever the story calls for them
This analysis step is what turns a plain block of text into a workable storyboard foundation.
Preparing a Strong Script Before Storyboarding
A well-structured script can make the storyboard-generation process much easier because the quality and clarity of the source story directly influence how scenes, characters, and visual details are interpreted. Before starting a storyboard project, creators should make sure the script has a clear sequence, recognizable characters, natural dialogue, and enough context for important actions, locations, and visual details.
For creators who have an idea but are unsure how to structure the first draft, an AI Script Generator can help develop a starting point that can later be edited and refined. It can be useful for brainstorming scenes, organizing ideas, and developing a basic narrative flow. However, the generated draft should still be reviewed carefully so the story, dialogue, pacing, character details, and creative direction accurately reflect the creator’s original vision.
Creating Characters, Locations, and Props Automatically :
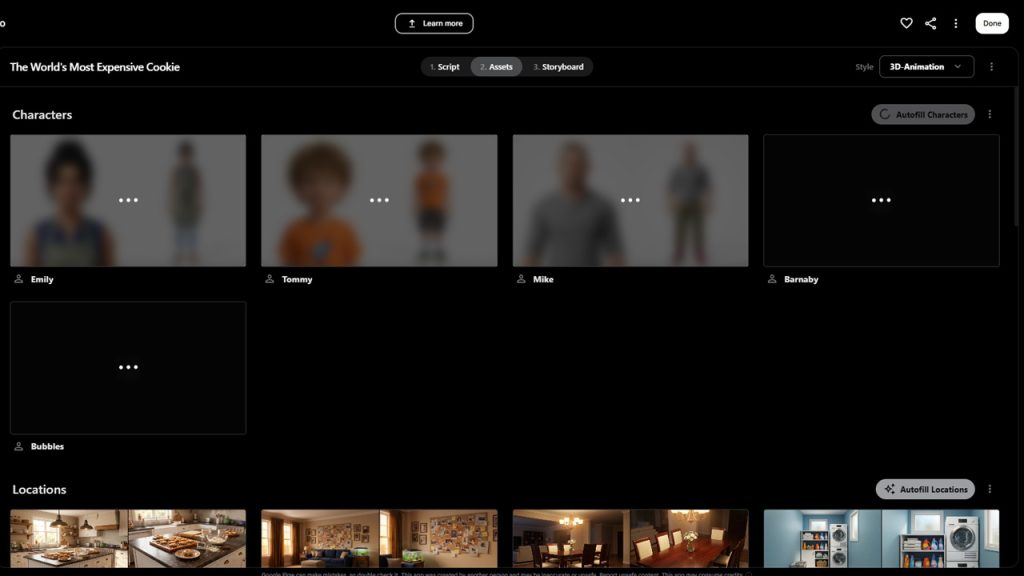
With the story in place, Storyboard Studio moves to the Assets section, and this is where a lot of manual work simply disappears.
- The tool scans your story and identifies characters, locations, and props automatically.
- Separate lists are created for each asset type.
- Nothing needs to be added manually at this stage unless you choose to.
It is a genuinely handy way to see, at a glance, everything your story will need visually.
Using Autofill Details for Assets :
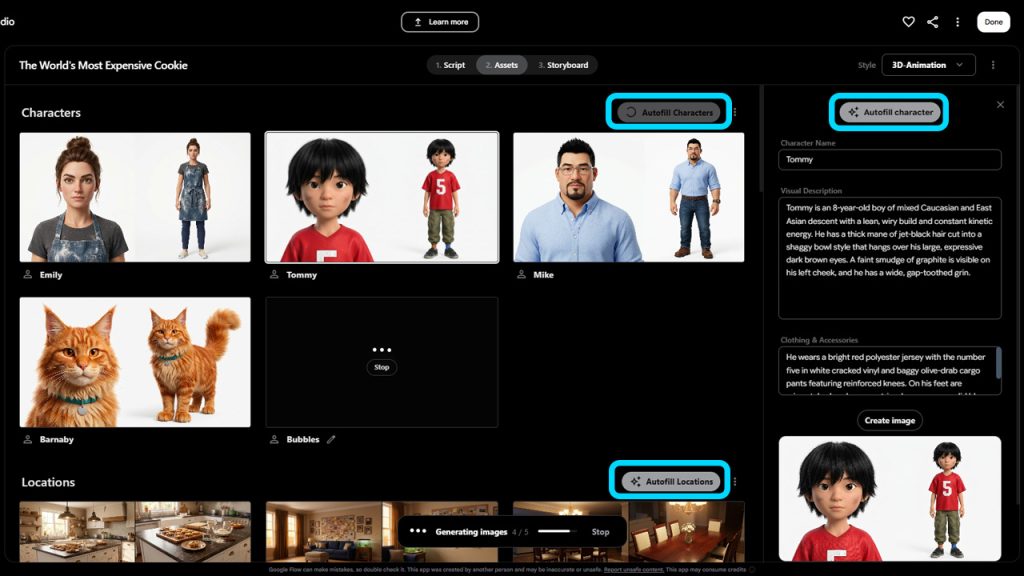
Writing detailed descriptions for every character and location can be tedious, so Autofill Details takes care of it for you.
- Click Autofill Details to generate descriptions for characters, locations, and props in one go.
- Each description is created automatically based on the story context.
- Prefer a personal touch? You can manually edit any asset to match your own vision.
This feature strikes a nice balance between saving time and keeping creative control in your hands.
Building Storyboard Scenes and Camera Shots
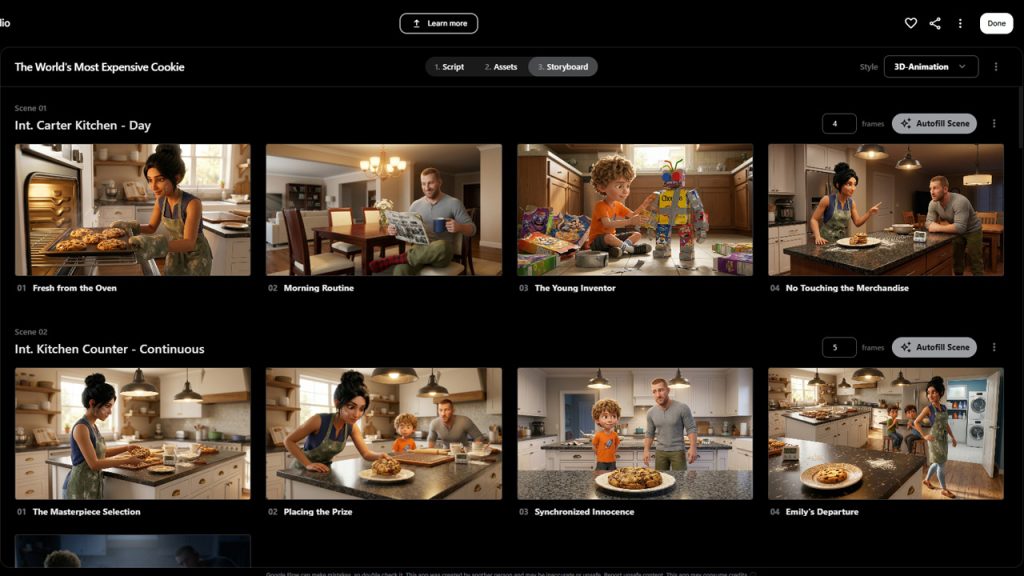
Once your assets are ready, the Storyboard section takes over and turns your story into something visual.
- Every scene from your story is automatically converted into a storyboard panel.
- Suitable camera shots are intelligently selected for each scene.
- The result feels far more cinematic than a plain text-based outline.
This is often the most satisfying step, since it is where your story finally starts to look like a real storyboard.
From Storyboards to AI Video Production
A storyboard provides the visual blueprint, but creators may still need a separate tool to turn those planned scenes into finished video content. Once the camera shots, characters, locations, and visual direction are finalized, AI video-generation platforms can help transform those ideas into moving scenes. Creators comparing different options can explore Best AI Video Generators in 2026 to understand which tools may fit their preferred video style, workflow, and production requirements.
The storyboard can also make the video-generation process more organized because creators already have a clear idea of what each scene should look like. Instead of experimenting without direction, they can use the planned shots, character details, and scene descriptions as a reference when generating video clips. This can help maintain a more consistent visual style across different parts of a project.
For filmmakers, marketers, educators, and content creators, this approach can make the transition from planning to production smoother. However, AI-generated clips may still require editing, sequencing, sound design, and other finishing touches before the final video is ready to publish.
Google Flow Pricing — Google AI Pro vs Google AI Ultra
Access to complete feature set of Google Flow, including Storyboard Studio, is associated with subscription plans of Google instead of one-off purchase:
- Google AI Pro gives you access to the core Flow features along with a set monthly generation allowance.
- Google AI Ultra is a higher premium plan and significantly increases the usage limits and adds early access to the latest Veo capabilities, including native generation of audios.
There is a free plan that does not require a Google AI subscription and offers you 50 daily Google flow credits. Thus, creators assessing Flow for current production must weigh the monthly costs against how many videos and storyboards they require every month. Let us see pricing plans of Google below-
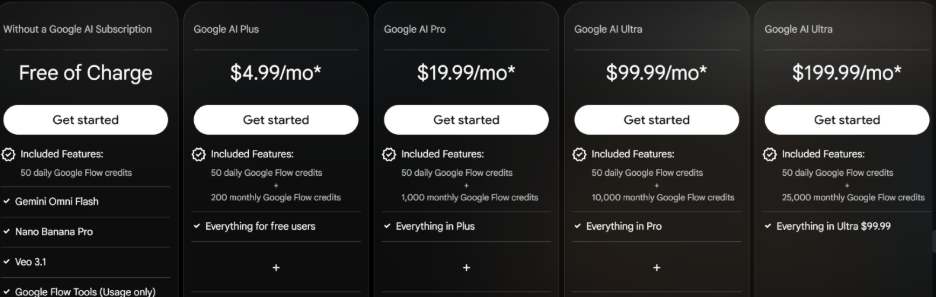
Alternative Way: You can try the free plan of Google Flow and complement it with a range of AI features of AIsuites workspace that allow creators to get tailored role-based output as per their project requirements and creative specifications.
Customizing Storyboard Panels :
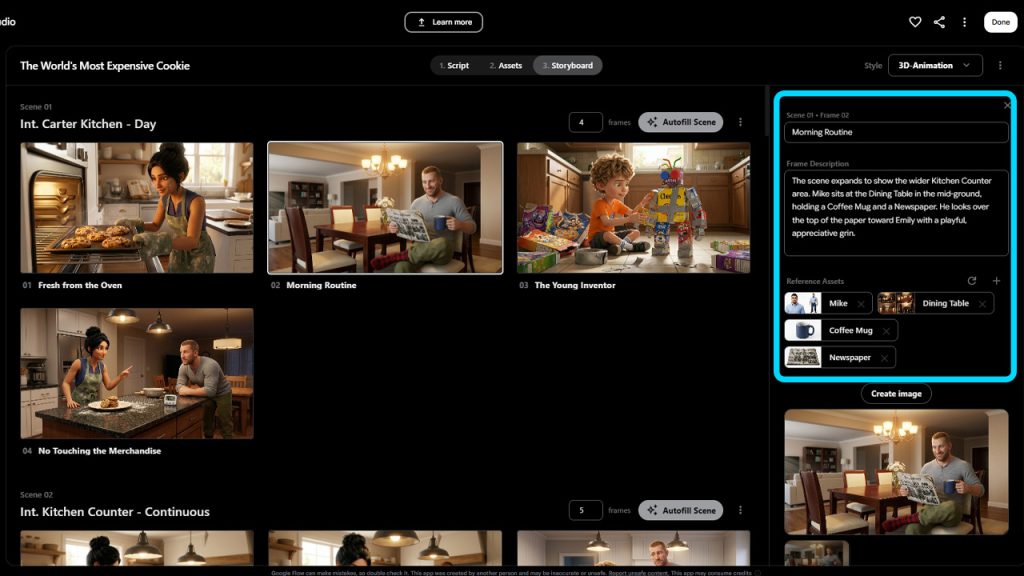
Automation is helpful, but every project has its own creative needs, and Storyboard Studio accounts for that too.
- Change camera angles for any panel that does not match your vision
- Adjust the number of shots within a particular scene
- Fine-tune panels individually without affecting the rest of the storyboard
Once you have reviewed all your scenes, characters, and camera shots, your project is essentially ready to go.
Exporting and Saving Projects as JSON Files :
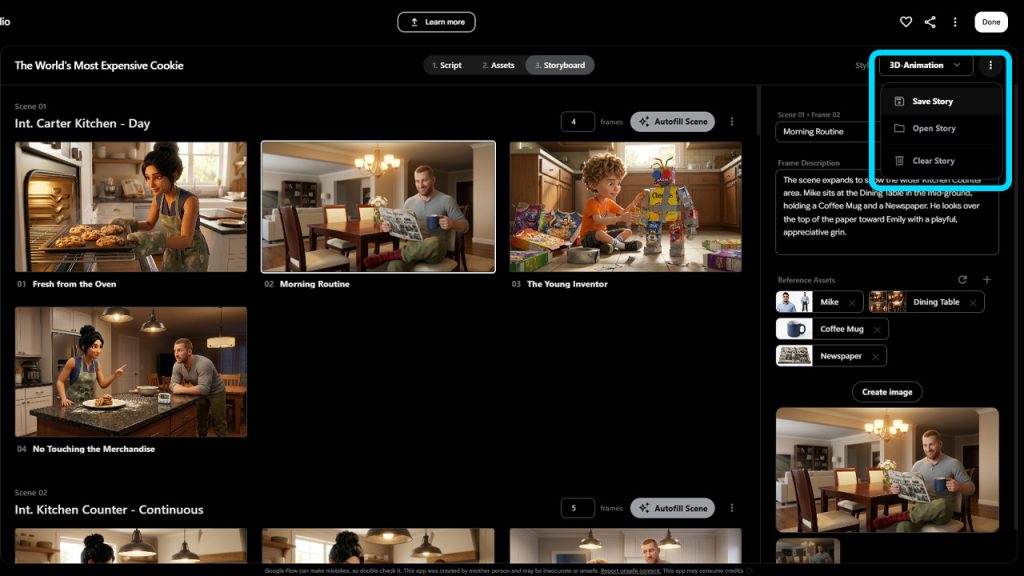
When your storyboard is complete, saving it takes just a couple of clicks.
- Click the three-dot menu in the top-right corner of the screen
- Select Save to export your entire project
- The export is saved as a JSON file containing your story, assets, scenes, and all related project data
This makes it easy to keep a complete backup of your work in a single file.
Importing Projects to Continue Editing Later :
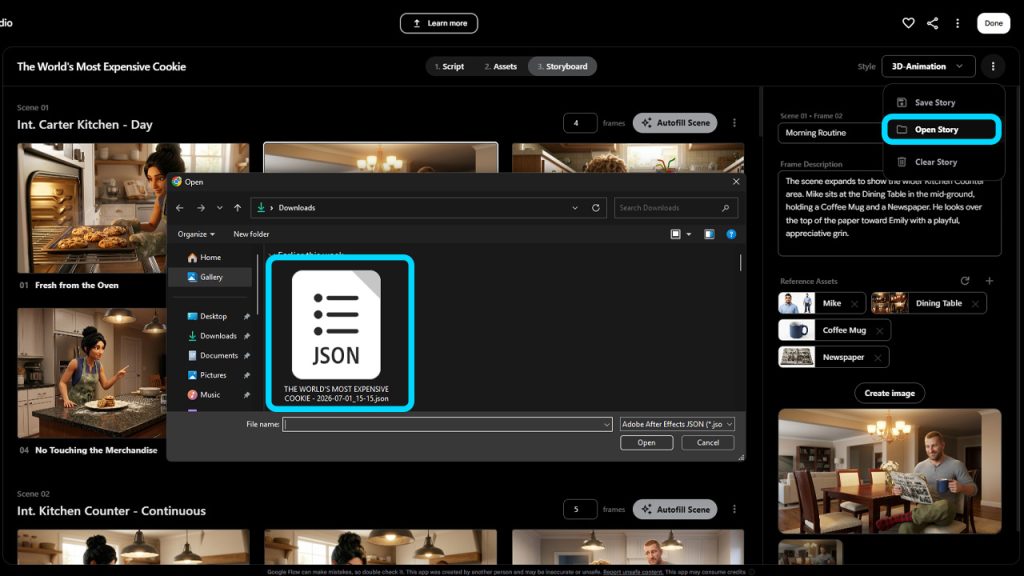
Not every storyboard gets finished in one sitting, and that is perfectly fine with Google Flow.
- Open Storyboard Studio and choose to import a project.
- Select the saved JSON file from your device.
- Your story, assets, scenes, and camera shots are all restored exactly as you left them.
There is no need to rebuild anything from scratch, which makes picking up long-term projects far less stressful.
How to Access Google Flow?
Google Flow is available to use on the web and can be downloaded from app stores. Users can visit flow.google.com or download the app from the app store. Then, after signing up, users can log in and start using the app. A few things to keep in mind:
- You must be at least 18 years of age and living in Google’s supported regions in order to use the app.
- There is a mobile app available, but in order to get the core experience, you have to use the web version of the tool.
- Since Flow is offered in the Google AI subscription plans, paid plans also give you accessibility to Google AI Pro/Ultra tools and features.
Conclusion
Google Flow gives you powerful features to generate images and videos and now also includes story-to-storyboard planning in a single AI filmmaking workspace powered by Imagen, Veo, and Gemini. Storyboard Studio is where this workspace becomes especially useful for pre-production. It allows creators to take a written story and turn it into characters, scenes, assets, and camera-ready panels within minutes, without leaving Flow. This structured approach can be useful for many creative projects, from traditional filmmaking to content designed around an AI Influencer, where consistent characters and visual storytelling are important.
Whether you are planning an animated series, a short film, or a marketing video, Google Flow provides a strong starting point instead of just a single generated clip. Once you have locked the storyboard, the same plan can help simplify video generation and move scenes from the panel stage toward polished final cuts.
Frequently Asked Questions :
Q. Do I need to write my own story to use Google Flow Storyboard Studio?
No, writing your own story is optional. You can either write one from scratch or use the built-in AI option to generate a story for you, then edit it as needed before continuing.
Q. Does Storyboard Studio create characters and locations automatically?
Yes. Once your story is added, the tool scans it and automatically creates separate lists for characters, locations, props, and other important objects.
Q. What does the Autofill Details feature do?
Autofill Details generates detailed descriptions for your characters, locations, and props with a single click, so you do not have to write these descriptions manually. You can still edit any asset by hand afterward.
Q. Can I change the camera shots that Storyboard Studio selects?
Yes. While the tool intelligently selects camera shots for each scene, you can manually adjust the camera angles or change the number of shots in any scene.
Q. How is my storyboard project saved, and can I continue it later?
Your project is saved by clicking the three-dot menu and selecting Save, which exports it as a JSON file containing the story, assets, scenes, and project data. You can import this file back into Storyboard Studio at any time to continue exactly where you left off.
Is Google Flow free to use?
Yes, there is a free tier that does not need a subscription. It limits daily credits to 50 and gives all the basic features.
Do I have to access Google in order to use Storyboard studio or is it a separate tool?
Storyboard Studio is not just a standalone product. It is one of the core features of Google Flow. You must have an active Flow account as well as an eligible subscription plan in order to access it.